This guide explains how to synchronize Moodle courses into WordPress and configure WooCommerce pricing, visibility, and publishing settings using CourseTransit.
Before proceeding, ensure:
- Moodle and WordPress are successfully connected
- WooCommerce is installed and activated
- Moodle courses already exist
- CourseTransit connection test completed successfully
Open the Courses Page #
All synchronized Moodle courses are managed from the Courses section inside CourseTransit.
- Log in to your WordPress admin dashboard
- Open CourseTransit from the sidebar
- Click Courses
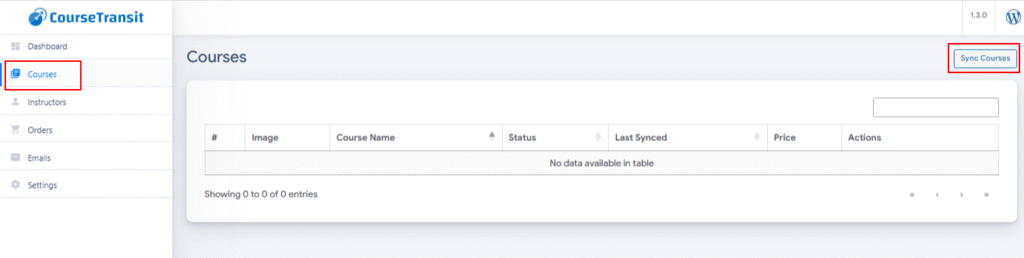
Synchronize Moodle Courses #
Use the Sync Courses button to import Moodle courses into WordPress automatically.
- Click the Sync Courses button
- Review the synchronization confirmation popup
- Click Yes, sync now
- Wait for the synchronization process to complete
- Review imported courses in the courses table
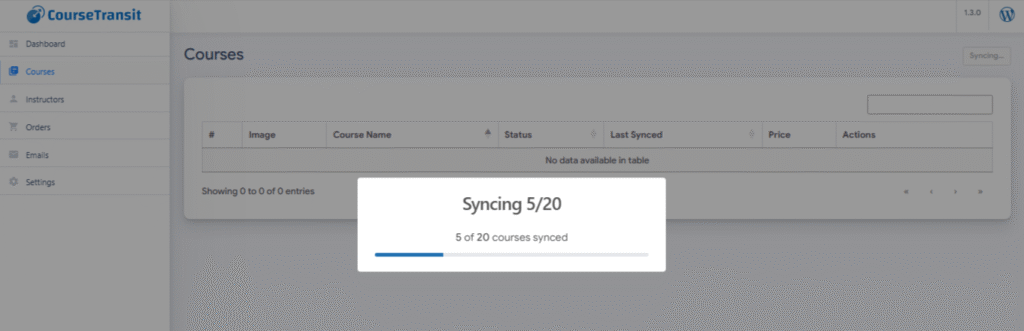
After confirmation, CourseTransit begins fetching and synchronizing Moodle courses into WordPress automatically.
- CourseTransit connects to the Moodle API
- Courses are fetched from Moodle
- WooCommerce products are created or updated
- Synchronization progress is displayed in real time
- The courses table refreshes after completion
ℹ️ ImportantDo not close or refresh the browser window while synchronization is in progress.
Synchronization time depends on:
- Total number of Moodle courses
- Server performance
- Course image sizes
- Hosting environment response time
Manage Synchronized Courses #
After Moodle courses are synchronized, all imported courses appear inside the CourseTransit Courses page. From here, administrators can manage synchronization, view course details, and quickly configure products.
Review Imported Courses #
All synchronized Moodle courses are displayed inside the Courses table.
Each course entry includes:
- Course image
- Course name
- Publication status
- Last synchronized date and time
- Product price
- Available management actions
The Courses page helps administrators monitor synchronized Moodle courses and manage WooCommerce product integration from a single location.
Synchronize Individual Courses #
Use the Sync button to update a specific Moodle course without running a full synchronization again.
Steps
- Navigate to CourseTransit → Courses
- Locate the course you want to update
- Click the Sync button
- Wait for the synchronization process to complete
During synchronization, CourseTransit fetches the latest course information from Moodle and updates the connected WooCommerce product automatically.
This includes:
- Course title updates
- Course descriptions
- Featured images
- Product metadata
- Synchronization timestamps
Use individual synchronization whenever changes are made to a Moodle course and you want to update the WordPress version immediately.
View Course Details #
Use the Details button to review synchronized course information and integration data.
Steps
- Locate the course inside the Courses table
- Click the Details button
- Review the course configuration and synchronization information
Inside the Course Details panel, administrators can view:
- Course title and thumbnail
- Moodle course ID
- Last synchronization date
- Number of sections
- Course language
- Grade support status
- Course start and end dates
- Curriculum and learning activities
The curriculum section displays synchronized Moodle content, including:
- Course sections
- Lessons and activities
- SCORM packages
- Learning resources
Administrators can also use the Open in Moodle button to quickly access the original Moodle course directly from WordPress.
This feature helps verify that course content and curriculum data were synchronized successfully between Moodle and WordPress.
Quick Edit Course Settings #
Use the Quick Edit feature to quickly update WooCommerce product settings for synchronized Moodle courses without leaving the Courses page.
Need advanced WooCommerce settings? Use the Open full edit page option to access the complete WooCommerce product editor.
The Quick Edit panel allows administrators to manage important product information directly from the course table.
Steps
- Navigate to CourseTransit → Courses
- Locate the synchronized course
- Click the Quick Edit button
- Update the required product settings
- Click Save to apply the changes
| Setting | Description |
|---|---|
| Product Title | Update the WooCommerce product title displayed on the store page. |
| Product Slug | Modify the product URL slug used for the course product page. |
| Regular Price | Set the standard WooCommerce product price for the course. |
| Sale Price | Configure a discounted course price for promotions or limited-time offers. |
| SKU | Assign or update the WooCommerce product SKU for inventory or product management purposes. |
| Product Visibility | Control where the course product appears inside the WooCommerce store. Available options may include: Visible, Catalog, Search, Hidden |
| Featured Product | Enable the Featured option to highlight the course product inside WooCommerce product listings or featured sections. |
| Product Status | Control the publication status of the synchronized course product. Available statuses may include: Published, Draft, Pending |
Quick Edit allows administrators to manage WooCommerce product settings efficiently without opening the full product editor.
For advanced WooCommerce configuration, use the Open full edit page option at the bottom of the Quick Edit panel.