

CourseTransit Pro allows administrators to combine multiple Moodle courses into a single WooCommerce bundle product. Customers can purchase the bundle and receive enrollment in each selected Moodle course.
The Course Bundles section allows you to create bundles, configure pricing, select included courses, and manage existing bundles directly from WordPress.
Accessing Course Bundles #
- Log in to your WordPress administrator dashboard.
- Open CourseTransit from the sidebar.
- Click Bundles.
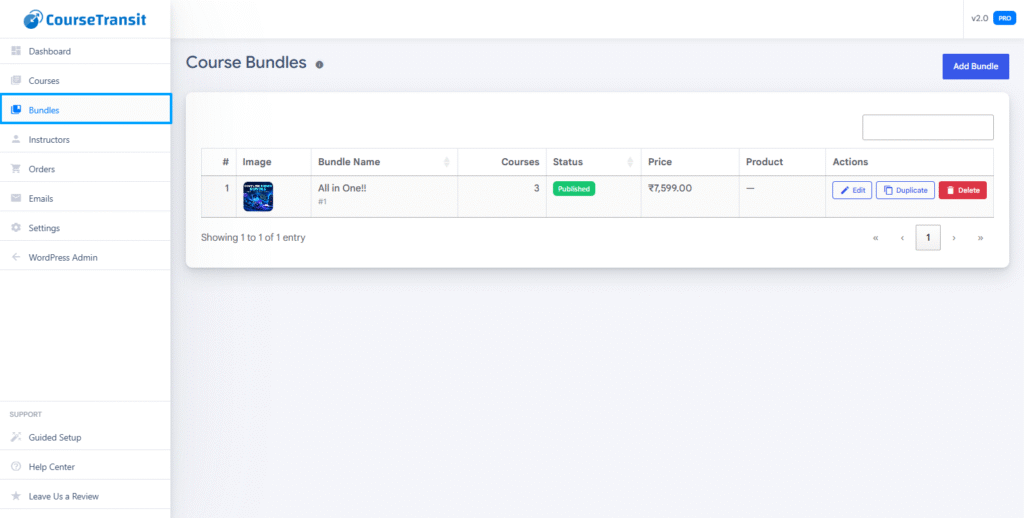
The Course Bundles page displays your existing bundles and provides options to create and manage them.
Understanding the Bundles Page #
The bundles table displays information about each configured bundle.
| Column | Description |
|---|---|
| Image | Image associated with the bundle. |
| Bundle Name | Name of the bundle. |
| Courses | Number of Moodle courses included in the bundle. |
| Status | Publication status of the bundle product. |
| Price | Price configured for the bundle. |
| Product | Associated WooCommerce product, when available. |
| Actions | Available management actions. |
The page also includes a search field and pagination controls to help you locate bundles.
Available Actions #
- Add Bundle — Create a new bundle.
- Edit — Modify an existing bundle’s configuration.
- Duplicate — Create a copy of an existing bundle.
- Delete — Remove a bundle.
Creating a Bundle #
To create a bundle:
- Navigate to CourseTransit → Bundles.
- Click Add Bundle.
- Complete the Bundle Information section.
- Configure the Bundle Product settings.
- Select the Moodle courses to include.
- Review your configuration.
- Click Save Bundle.
Bundle Information #
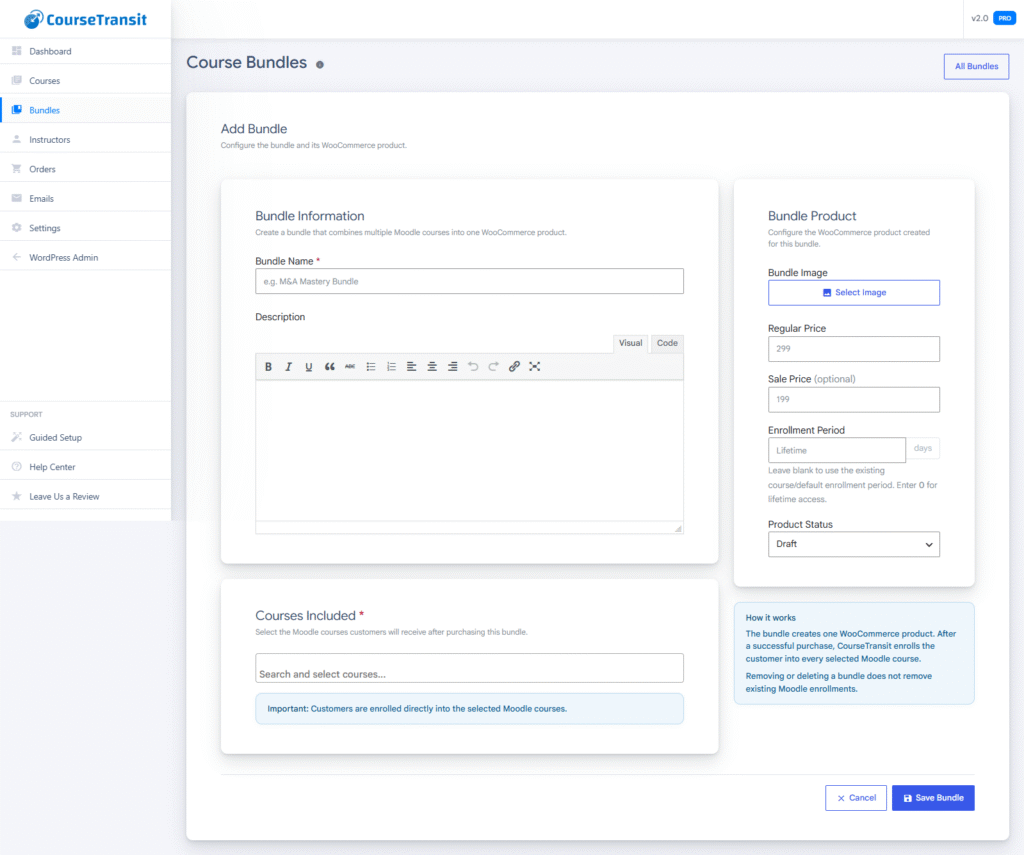
The Bundle Information section contains the basic details of your bundle.
Bundle Name #
Enter a descriptive name for the bundle. This name helps administrators and customers identify the collection of courses.
Example: All in One Bundle
Description #
Enter a description explaining the purpose and contents of the bundle. Use the rich text editor to format the description as needed.
Configure the Bundle Product #
The Bundle Product section controls the WooCommerce product created for the bundle.
Bundle Image #
Select an image to represent the bundle in your store.
Choose an image that clearly communicates the courses or learning outcomes included in the bundle.
Regular Price #
Enter the standard selling price of the bundle.
Sale Price #
Optionally, enter a discounted price for the bundle.
Leave this field empty if you do not want to configure a sale price.
Enrollment Period #
Configure the enrollment duration for the courses included in the bundle.
The interface provides an enrollment-period field measured in days. Leave it blank to use the existing course or default enrollment period. Enter 0 for lifetime access.
Product Status #
Choose the publication status of the bundle product.
The Add Bundle interface includes a status selector, with Draft shown as the default in the supplied screenshot. Review the selected status before saving.
Select Courses Included in the Bundle #
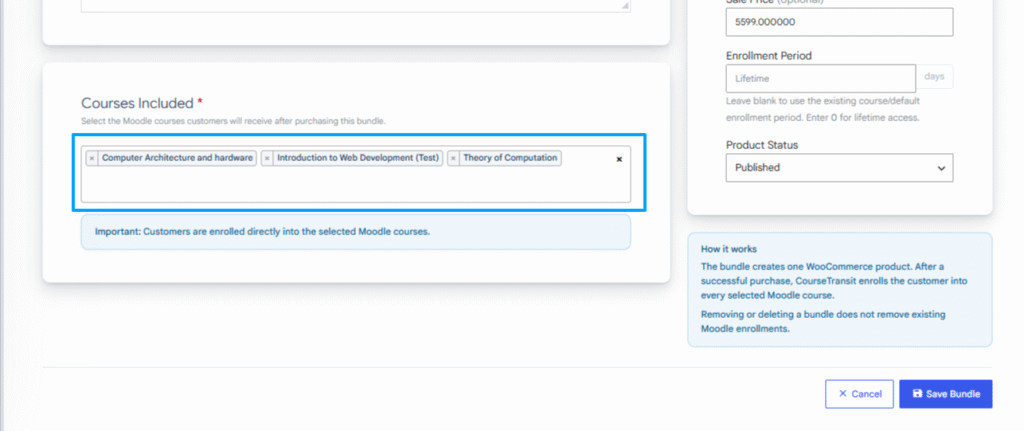
The Courses Included section lets you select the Moodle courses customers will receive after purchasing the bundle.
- Locate the Courses Included section.
- Click the course search and selection field.
- Search for the required Moodle courses.
- Select each course you want to include.
- Review the selected courses before saving.
Important: Customers are enrolled directly into the selected Moodle courses after a successful bundle purchase.
A bundle creates one WooCommerce product for multiple Moodle courses. This allows customers to purchase a collection of courses through a single product.
Save the Bundle #
Before saving, verify the following:
- The bundle name is correct.
- The description explains the bundle.
- The bundle image is appropriate.
- The regular and sale prices are correct.
- The enrollment period is configured as required.
- The product status is appropriate.
- All required Moodle courses have been selected.
Click Save Bundle to save the configuration.
After saving, return to the Course Bundles page to review the bundle in the table.
Manage Existing Bundles #
You can manage previously created bundles from CourseTransit → Bundles.
Edit a Bundle #
- Locate the bundle in the table.
- Click Edit.
- Update the required information.
- Save the changes.
Duplicate a Bundle #
Use Duplicate when you want to create a similar bundle without entering all its details again.
- Locate the bundle you want to copy.
- Click Duplicate.
- Review the copied configuration.
- Update the name, courses, pricing, or other settings as required.
- Save the new bundle.
Delete a Bundle #
- Locate the bundle you want to remove.
- Click Delete.
- Review the confirmation prompt, if displayed.
- Confirm the action if you want to proceed.
Important: Removing or deleting a bundle does not remove existing Moodle enrollments. Customers who have already been enrolled in the included courses retain those enrollments unless they are changed separately in Moodle.
How Bundle Enrollment Works #
A CourseTransit bundle connects one WooCommerce product with multiple Moodle courses.
The general workflow is:
- An administrator creates a bundle and selects its Moodle courses.
- The bundle is saved as a WooCommerce product.
- A customer purchases the bundle.
- After a successful purchase, CourseTransit enrolls the customer in each selected Moodle course.
This approach allows customers to purchase related courses together while maintaining the individual Moodle courses and their enrollment records.
Important Notes #
- Course Bundles is a CourseTransit Pro feature and requires a valid Pro license.
- Ensure that Moodle and WordPress are connected correctly before creating bundles.
- Review the selected courses and pricing before saving.
- Deleting a bundle does not remove existing Moodle enrollments.
- Changes to bundle configuration should be reviewed carefully before publishing or selling the product.
Next Step #
Continue to Bulk Purchase & Request a Quote to learn how to configure multi-seat purchases and quote-based purchasing for your customers.


